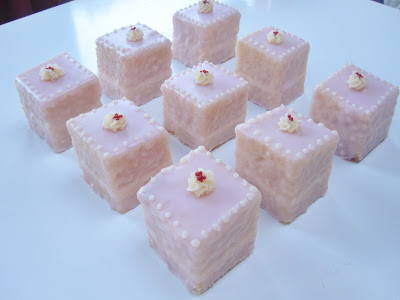
This week's post is for mini iced sponges, which are pretty much fondant fancies minus the fondant. They take a lot of intricate work and time, but they're definitely worth it. And they make the perfect treat for some afternoon tea :)
So let's get started...
You will need:
- 200g butter
- 200g caster sugar
- 4 eggs
- 200g self raising flour
- 75g butter
- 175g icing sugar
- 15ml milk
- 500g icing sugar
- water
- food colouring of your choice
- sprinkles (optional) I used Cake Angels' 'Great British Sprinkles'
2. Cream together the butter and sugar
3. Add the eggs, one at a time
4. Add the flour and continue to mix until you have a smooth batter
5. Place the mixture into the tray and bake for approximately 35minutes
6. When the cake is out of the oven, allow to cool for a bit in the tray, before transferring to a wire rack for further cooling
7. Once the cake is cooled, use a knife to level the top of the cake, then cut the cake in half horizontally
8. Cream together 75g butter, 175g icing sugar and 15ml milk to make the icing for the centre of the cake
9. Spread the icing on one of the cake layers and sandwich the cake together
10. Using a sharp knife, cut the scraps off the sides of the cake to create a clean edge. Evenly cut the cake into approximately 16 squares; depending how large/ small you want each cake to be
11. Mix 500g icing sugar with a tablespoon of water at a time, until you have your desired consistency for the icing that will cover the entire mini cakes
12. Coat each mini cake in the icing and allow to set slightly
13. Taking any leftover icing from the centre of the cake, fill a piping bag with a Drop Flower tip and pipe a little 'blob' on the top centre of each cake
14. Using a very small round icing tip or snipping a small hole off the bottom of a piping bag, pipe a border of dots on each mini cake
15. Lastly, you can add some sprinkles to your mini iced cakes; just to make them look even more adorable :)
And you're done!
Thank you so much for checking out this week's blog post, I hope you enjoyed and I'll see you next week :)


No comments:
Post a Comment